General Decal Application Instructions
Important Notice:
Attn: Body and Paint Shops! If your fairings have been freshly painted please allow 3 or more days for paint to fully cure before you apply the decals. If you do not allow the paint to fully cure you may get tiny air bubbles in the decal that will appear after the application. These bubbles may or may not dissapate in direct sunlight over time.
Your Decal consists of 3 parts:
1. - Top layer or Clear Transfer/Application Tape - Covers and holds decal while allowing you to apply decal in one piece.
2. - The Decal itself.
3. - Backing Paper - White colored wax-like paper which protects the adhesive side of the decals until it is ready to be applied.
**Also remember to follow these tips below to insure proper application.
-Clean area before installation. Be sure there is no dirt, wax, grease, ect... in the area you will apply the decal.
-Use a squeegee for application. A squeegee can be found at most auto and marine part stores.
-Turn the decal upside down and slowly peel the wax paper backing off the decal. Peeling flat and at an angle may work the best. The decal should stay adhered to the clear mask and only the wax paper backing should be removed.
-If the decal is not sticking to the clear transfer tape when removing the wax paper simply turn the decal back over and squeegee or rub the decal to allow the tape to adhere back to the decal.
-Any bubbles after application can be pricked with a needle and worked out with your finger from the outside in.
**Application area's when there are curves in more than one direction may need specific attention:
(Ex. side number plates or tail fairings on your motorcycle.)
-The use of a heat gun or hair drier and wet application may be needed to ensure application without wrinkles.
-Spray application area with Application Solution or a mixture of soap and water (2 drops of dish soap to 1 liter of water) before you stick the decal on your bike.
-Be Careful not to get the backing paper wet, once wet the backing paper cannot be removed from the back of the decal.
-After backing is removed stick the decal in place. The soapy water allows you to move you decal into place.
-Once in place, squeegee down the decal to remove the excess air and water.
-Allow 20 minutes or longer for the decal to adhere before removal of the clear transfer/application tape.
Tank Pad Instructions
There are a few tips to help keep your tank pad in place...
1. Clean area on gas tank before installing on your Tank Pad.
2. In cold conditions heat your tank pad by the sun or you may use a hair dryer.
3. Cleaning of tank pad regularly is recommended.
4. Be Careful not to bend your Tank Pad.
Rim Stripe Instructions
This rim stripe kit includes 5 stripes. You will need two stripes to cover each rim. An extra stripe is included for practice, future repair or as a spare. Each stripe is 3/8” wide by 48” long to accommodate up to a 19” rim. Should fit all sportbikes with some minor trimming.

1. Clean your rims with soap and water.
2. Cut each stripe apart.
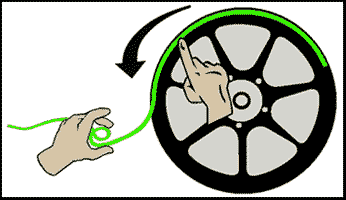
3. Peel back about 4”of wax paper and stick the beginning of the stripe on your rim.
4. Hold the majority of the stripe with your left hand and using your right hand to smooth, stretch and stick the stripe down.
5. Follow this procedure until you have completely cover the rim.
6. Be sure to overlap the strip slightly and trim any excess material